Friday, March 13, 2015

BackTrack Linux Tools

BackTrack Linux Tools
Penetration (Pen) testing and security auditing are now part of every system administrator's "other duties as assigned." BackTrack Linux (http://www.backtrack-linux.org/) is a custom distribution designed for security testing for all skill levels from novice to expert. It is the largest collection of wireless hacking, server exploiting, web application assessing, social-engineering tools available in a single Linux distribution.

BackTrack Linux is a fine example of a specialized Linux distribution. Its only purpose is to test your network, devices, and systems for security vulnerabilities. BackTrack is packed with every security and hacker tool used by security professionals and professional hackers. If you're looking for all of the tools in one place, this is it.

You must love the command line to use this distro, although it does contain a few graphical tools, such as zenmap and wireshark . Even in graphical mode (which comes up with the Gnome desktop), most of the applications open in a terminal window. Fortunately, each command line application opens and displays the help text so you can refer to the command reference right there on the screen.

BackTrack is a highly customized, Debian-based Linux distribution that you should only update through BackTrack's own repositories (http://all.repository.backtrack-linux.org/).

What Do You Get For Nothing?

BackTrack Linux contains more than 300 security tools and utilities that are all open source. Many security professionals prefer them over expensive commercial programs. And, hackers certainly prefer hundreds of no cost, high-end applications to anything commercial. One reason for BackTrack's popularity is its anonymity. You don't have to register (Registration is optional). No names, bank accounts, or user accounts are associated with obtaining the ISO image. Additionally, no spyware will report back to any vendor.

In short, BackTrack's tagline says it all: "The quieter you become, the more you are able to hear."

The distro is a bootable, live DVD that's approximately 2GB in size. If you decide to install it to a hard disk or USB drive, the installation expands to almost 7GB. BackTrack is perfectly suited to installation to a USB drive, so that it's portable and stealthier than a hard disk install. A 16GB USB drive holds the installation with plenty of room for saving files and data.
Remember that you'll need to save your data from your information gathering exercises so that you can write security audit reports for your clients. The Live DVD is powerful but considerably slower than a hard disk or USB disk. If you use the DVD, use a USB drive or mountable hard disk partition to save the information you gather.

What's Included in the Distro

The BackTrack Distribution includes the following major tool categories:
  • Information Gathering
  • Vulnerability Assessment
  • Exploitation Tools
  • Privilege Escalation
  • Maintaining Access
  • Reverse Engineering
  • RFID Tools
  • Stress Testing
  • Forensics
  • Reporting Tools
  • Services
  • Miscellaneous
Under each of the main headings, you'll find subheadings. For example, under the first selection,Information Gathering , you have Network Analysis, Web Application Analysis, Database Analysis, and Wireless Analysis. Under each of those subheadings, you have multiple types of analyses. The Network Analysis subheading contains an extensive list of network analysis types from DNS Analysis to VPN Analysis, as shown in Figure 1.
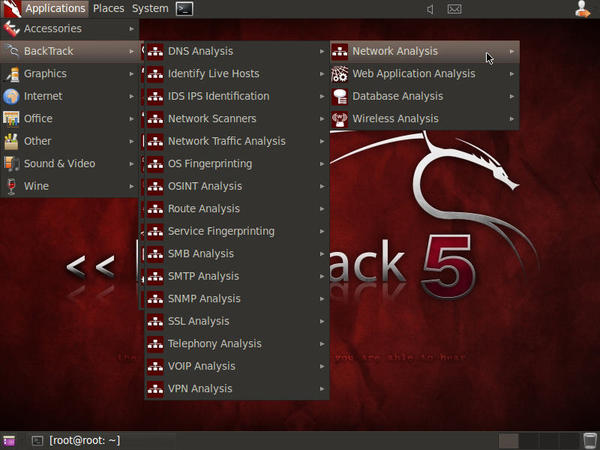
Figure 1: BackTrack->Information Gathering->Network Analysis.
At the final level, you'll find multiple choices for each type of analysis. For example, under Network Scanners , you have a list of 11 different network scanning tools from which to choose. See Figure 2.


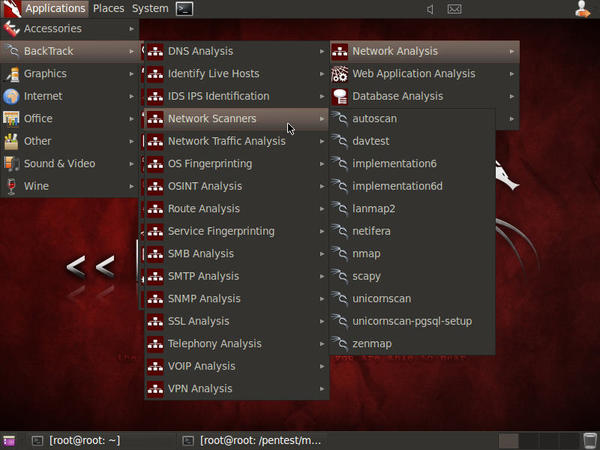
Figure 2: The list of BackTrack's Network Scanner tools.
Continue reading

Install and configure nagios core 4 on Ubuntu 12.04 LTS

Install and configure nagios core 4 on Ubuntu 12.04 LTS
In this tutorial we will install and configure nagios core 4 on Ubuntu 12.04 LTS. Nagios Core 4 has recently been released,at the time of writing this post Nagios core 4.0.2 was available.

Nagios is one of the most popular,reliable and robust Monitoring System.You can find number of plugins to monitor the network and server resources.
Best thing is Nagios Core is open source.You can modify the monitoring system as per your requirement.You can also create your own nagios plugins.We suggest you to submit your Nagios related contribution in exchange.nagios.org
Nagios team has added lots of new feature in Nagios Core 4.x Version over last version.To read about new feature in Nagios Core 4.x here is the referral link .
We also suggest you to read about version history(Referral link : Nagios core 4.x Version history)

Install and configure Nagios Core 4 in Ubuntu

We are doing this practical in Ubuntu 12.04 LTS. Given below are the brief description of our specs
Operating System : Ubuntu 12.04 LTS (x86_64)
Package Name : Nagios Core 4.0.2
Apache Version : 2.2.22-1ubuntu1.4
IP Address of Nagios Server : 192.168.56.101
Note: The practical has been performed in Freshly installed Ubuntu 12.04 LTS
Follow the given below steps to install and configure Nagios core 4.x in Ubuntu
Step 1 : Login in Server and become super user. Now install dependencies require for Nagios core 4 version
sudo su -

apt
-get update

apt
-get install wget build-essential apache2 php5 openssl perl make php5-gd wget libgd2-xpm libgd2-xpm-dev libapache2-mod-php5 libperl-dev libssl-dev daemon
Step 2 : Download the Nagios core 4 package
wget http://nchc.dl.sourceforge.net/project/nagios/nagios-4.x/nagios-4.0.2/nagios-4.0.2.tar.gz
Step 3 : Now untar the downloaded nagios package
tar -xvzf nagios-4.0.2.tar.gz
Step 4 : Create user nagios and group nagcmd. Add the nagios user in supplementry group nagcmd
useradd nagios
groupadd nagcmd
usermod
-a -G nagcmd nagios
Step 5 : Compile and install nagios
cd nagios-4.0.2/
./configure --with-command-group=nagcmd
make all
make install
make install
-init
make install
-config
make install
-commandmode
make install
-webconf

Step 6 :
 Copy eventhandlers directory into nagios base directory . Change the owner and group to nagios
cp -rvf contrib/eventhandlers/ /usr/local/nagios/libexec/

chown
-R nagios:nagios /usr/local/nagios/libexec/eventhandlers
Step 7 : Set nagiosadmin user password.It is a default user for Nagios dashboard administration .
Give the password for nagiosadmin and we will use it in Nagios Dashboard
htpasswd -c /usr/local/nagios/etc/htpasswd.users nagiosadmin
Step 8 : Enable the rewrite apache module.Restart the apache after this.
a2enmod rewrite
/etc/init.d/apache2 restart
Step 9 : Starting the Nagios . We found problem while starting the nagios.Hence we will create service init script for nagios to start/stop the nagios service
Note: As per new nagios, the init script for nagios has problem with functions of Ubuntu/Debian system.
Below given is the error ,which we have found while running the command /etc/init.d/nagios start
root@ubuntu:~# /etc/init.d/nagios start
/etc/init.d/nagios: 20: .: Can’t open /etc/rc.d/init.d/functions
root@ubuntu:~#
Create a new file in /etc/init with name called nagios.conf
For service init script,we have taken reference from ssh.conf and rsyslog.conf file (path is /etc/init/ssh.conf and /etc/init/rsyslog.conf)
vi /etc/init/nagios.conf
## paste the below given content in /etc/init/nagios.conf
# nagios4 init script
### use command 'service nagios start|stop|restart'

description
"nagios 4.x core"

start on filesystems
stop on runlevel
[1246]

respawn

setuid nagios
setgid nagcmd
console log

script
exec /usr/local/nagios/bin/nagios /usr/local/nagios/etc/nagios.cfgend script
Step 10 : Now start the nagios service
service nagios start
Note 1: To stop the Nagios service
service nagios stop
Note 2: To check the status of Nagios service
service nagios status
Step 11 : There is one more problem i.e with eventhandlers found in Ubuntu.(See in this referral link)To fix this issue ,run below given command
chmod 666 /usr/local/nagios/var/rw/nagios.cmd
Step 12 : After starting nagios service.Open the web browser and type the URL appended with /nagios
example http://192.168.56.101/nagios
(Replace the 192.168.56.101 with your server ip address or domain name)
Nagios core 4 ubuntu
When you click on Services tab in Nagios Dashboard,you may see lots of Red area which means plugin is not installed.. For this we will install Nagios plugins.
Nagios core 4 Services

Install and configure Nagios plugin in Nagios Server

Now we will install nagios plugins in Nagios server for local alert check .
Step 13 : Download the nagios plugins in Nagios Server
cd ~
wget https
://www.nagios-plugins.org/download/nagios-plugins-1.5.tar.gz
Step 14: Untar the compressesed nagios-plugins-1.5.tar.gz file
tar -xvzf nagios-plugins-1.5.tar.gz
Step 15 : Change to extracted nagios-pligins directory and install the plugins
cd nagios-plugins-1.5
./configure --with-nagios-user=nagios --with-nagios-group=nagios

make

make install
Step 16 : Wait for a minimum 90 Seconds.The dashboard will be updated and all checks will be active. You can notice all Red colors change to Green colors
Nagios Core 4
Note : Rather then waiting, you can reschedule the check in nagios.
Click on any Service for eg. “Current Load” . Now see at right hand side. There is a link called “Re-schedule the next check of this service“. Click on it, and after giving reschedule time,click ok. The Nagios Server will check and update the information in new re-schedule time.
Below is the reference screenshot of “Service Commands” section
Nagios Service Commands
Continue reading

Thursday, March 12, 2015

Recover deleted files from ext3/ext4 partition on CentoS 6


I used ext4 magic, replacement for extundelete and ext3grep:
http://openfacts2.berlios.de/wikien/index.php/BerliosProject:Ext4magic

I have rpm's for CentOS 6 I downloaded from somewhere at:
http://rpms.plnet.rs/plnet-centos6-i386/RPMS.plnet-downloaded/ext4magic-0.3.1-1.2.i686.rpm
http://rpms.p

1. First thing to do is to unmount that partition and stop using it. If it is root partition, shutdown system and boot LiveCD/LiveDV
 6.x and work from it

2. Create a copy of your partition (to a filesystem where you have enough free space!):

# dd if=/dev/DEVICE of=/BACKUPPATH/DEVICE.img

3. Create a backup of ext3/ext4 Journal:
# debugfs -R "dump /BACKUPPATH/journal.copy" /dev/DEVICE

4. Download and install ext4magic rpm:

CentOS i386 - for 32-bit system/LiveCD:
# wget http://rpms.plnet.rs/plnet-centos6-i386/RPMS.plnet-downloaded/ext4magic-0.3.1-1.2.i686.rpm
# yum install ext4magic-0.3.1-1.2.i686.rpm

CentOS 6 x86_64:
# wget http://rpms.plnet.rs/plnet-centos6-x86_64/RPMS.plnet-downloaded/ext4magic-0.3.1-1.2.x86_64.rpm
# yum install ext4magic-0.3.1-1.2.x86_64.rpm

5a. Run ext4magic on the copy/dd-image to recover all deleted files (-m switch):

# ext4magic /BACKUPPATH/DEVICE.img -m -j /BACKUPPATH/journal.copy

5b. Run ext4magic on the actual partition (not recomended!):

# ext4magic /dev/DEVICE -j /BACKUPPATH/journal.copy -m

5c. Recovers all files deleted the last 24 hours from directory user1/ which have the stringjpg in their filename. The recovered files are stored at /LOCATION_TO_SAVE_FILES. A temporary file ./tmpfile is used to get the list of filenames to recover. :

# ext4magic /BACKUPPATH/DEVICE.img -Lx -f user1 | grep "jpg" > ./tmpfile
# ext4magic /BACKUPPATH/DEVICE.img -i ./tmpfile -r -d /LOCATION_TO_SAVE_FILES

5d. Since the files were delete 4 days ago, I decided to R recover (everything) after 5 days ago and before 2 days ago:

# ext4magic -R -a $(date -d “-5day” +%s) -b $(date -d “-2day” +%s) \ -d /LOCATION_TO_SAVE_FILES /BACKUPPATH/DEVICE.img

More help:
http://source.kohlerville.com/2013/02/ext4-recover-deleted-files-undelete-using-ext4magic-on-centos-6/

You can use "man ext4magic" to get more help.

Continue reading

How To Configure Postfix Server and Mail Aliases In RHEL-6 OR CentOs6


Postfix is fast and popular SMTP server widely used. The main job of postfix is to relay mail locally or to intended destination outside the network. Some of the most popular SMTP servers are Sendmail, Postfix and Qmail. By default Sendmail comes pre-installed with CentOS/RHEL 5. We will need need to remove it and install Postfix. On CentOS/RHEL 6 ‘postfix’ are installed by default, so there are no need to install it

Mail Process-

MTA-     Mail Transfer Agent

MDA-    Mail Delivery Agent
MUA-    Mail User Agent
MRA-    Mail Retiveral Agent
MAA-    Mail Access Agent


Package-        Postfix
Port No -        25 [smtp]
Script-            /etc/init.d/postfix
Daemon-        Postfix
Config file-    /etc/postfix/main.cf


Note- Before install postfix, remove sendmail from the server. Because sendmail is the default MTA in Redhat/CentOS.


[root@server ~]# yum remove sendmail

Prerequisites:-
 1- The mail server should contain a valid MX record in the DNS server. Navigate to this link how to setup DNS server.

2- Firewall and SELinux should be disabled.

[root@server ~]# service iptables stop
[root@server ~]# service ip6tables stop
[root@server ~]# chkconfig iptables off
[root@server ~]# chkconfig ip6tables off

[root@server ~]# vim /etc/selinux/config
-------------------------------------------------------------------------------

# This file controls the state of SELinux on the system.
# SELINUX= can take one of these three values:
#     enforcing - SELinux security policy is enforced.
#     permissive - SELinux prints warnings instead of enforcing.
#     disabled - No SELinux policy is loaded.
SELINUX=disabled
# SELINUXTYPE= can take one of these two values:
#     targeted - Targeted processes are protected,
#     mls - Multi Level Security protection.
SELINUXTYPE=targeted


:wq!
-------------------------------------------------------------------------------


Reboot the server.


Scenario-

Hostname     = 
server.ramesh.com
IP Address    = 
192.168.1.10/24

And my server is configured with proper MX record in DNS server.


Installation-


Step-1 First Install postfix Packege


[root@server ~]# yum install postfix

Step-2 Configuration
[root@server ~]# vim /etc/postfix/main.cf

--------------------------------------------------------------------------
myhostname = server.ramesh.com  -->line no 75 - uncomment and enter your host name
mydomain = ramesh.com 
-->line no 83 - uncomment and enter your domain name myorigin = $mydomain  -->line no 99 - uncomment
inet_interfaces = all
  
-->line no 116 - change to all
mydestination = $myhostname, localhost.$mydomain, localhost, $mydomain  
-->line no 164 - add $domain at the end
mynetworks = 192.168.1.0/24, 127.0.0.0/8  
-->line no 264 - uncomment and add your network range
home_mailbox = Maildir/  
-->line no 419 - uncomment


:wq!
--------------------------------------------------------------------------

Step-3 Start the postfix service.

[root@server ~]# service postfix start
Starting postfix:                                          [  OK  ]
[root@server ~]# chkconfig postfix on


Step-4  Create a User..

[root@server ~]# useradd test-1

[root@server ~]# passwd test-1

Changing password for user test-1.
New password:
BAD PASSWORD: it is based on a dictionary word
Retype new password:
passwd: all authentication tokens updated successfully.


Step-5 Check Mail

[root@server ~]# mail test-1@ramesh.com
Subject: Hi,
This is the testing mail by mail server {ctrl-d 2 times for save]

[root@server ~]# su test-1


[test-1@server ~]$ mail
----------------------------------------------------------------------------------

Heirloom Mail version 12.4 7/29/08.  Type ? for help.
"/var/spool/mail/root": 1 message 1 new
>N  1 root              Sun Aug 19 16:57  18/597   "hi"
& 1
Message  1:
From root@ramesh.com  Thu May 28 16:57:53 2012
Return-Path: <root@ramesh.com>
X-Original-To: root@ramesh.com
Delivered-To: root@ramesh.com
Date: Sun, 28 May 2014 16:57:53 +0530
To: root@ramesh.com
Subject: hi
User-Agent: Heirloom mailx 12.4 7/28/05
Content-Type: text/plain; charset=us-ascii
From: root@ramesh.com (root)
Status: R

This is the testing mail by mail server.
& exit
You have mail in /var/spool/mail/root.
----------------------------------------------------------------------------------


[test-1@server ~]$ exit

[root@server ~]#

Now Postfix Server Configuration successfully Completed.


Configure Mail Aliases-


An email alias is an email address that forwards to another email address.
For example, if your primary email address is "test-1@ramesh.com", you might create a second email address called "test-2@ramesh.com", which is easier for people to remember. Messages sent to your "test-2@ramesh.com" account would then be forwarded to your "test-1@ramesh.com" account.

The ability to create email aliases depends on your email provider. Once you have set it up (probably through your provider's website), you can configure Thunderbird to download and sort messages to your alias account in the same manner it deals with messages to your primary account. 


1- Create a two user like..[root@server ~]# useradd test-1

[root@server ~]# useradd test-2
[root@server ~]# passwd test-1
[root@server ~]# passwd test-2

2- Edit ..

[root@server ~]# vim /etc/aliases 

----------------------------------------------------------------------------------

www:            webmaster
webmaster:   root
noc:              root
security:        root
hostmaster:   root
info:              postmaster
marketing:    postmaster
sales:           postmaster
support:       postmaster
test-1:          test-2


:wq! 

---------------------------------------------------------------------------------- 

Note- Now you will send a mail to test-1 user and it will transfer to test-2.

[root@server ~]# su - test-2


[root@server ~]# mail

( Note-It will show the mail which send by root user to test-1 user )

Continue reading

How To Create and run your own command on linux


Linux operating system allows users to create commands and execute them over the command line. To create a command in Linux,the first step is to create a bash script for the command. The second step is to make the command executable.The script can be run only after file permissions have been changed to executable mode. Once changed, copy it to the binary path of Linux so that it can be run just like system-defined commands of operating systems. Follow these easy steps to create a command in Linux. 

Step 1:- First step to create bash file which will run your command on command line. Open vim or any editor, and type following code on file,

[root@server ramesh]# vim file-name

 
#!/bin/bash         

 echo "this is my first chance to create my own command'"     

 #then the rest of the files     

 echo "files of current directory are"

  ls


:wq (Save & Quit )


Give the file name as same as Command name you want to create, save this file.

Step2:- Now, you have to make this file executable. To make it executable use chmod command with option +x. CHMOD command is basically used to give access permission of files to user accounts. For more information about chmod command, open your terminal and type man chmod, you will get all information about chmod.

(Example for making file executable)


[root@server ramesh]# chmod +x  filel-name


Step3:- Now you have to copy this executable file to binary path of Linux that is “/usr/bin/”.
[root@server ramesh]# cp -rvf file-name /usr/bin


Sometimes for sudo (super user do) account user, it will not give you permission to copy this file to binary path of Linux. So to solve this we have to switch our account to root account, for this just type su command on terminal, it will asked you the current account password (only if you don’t created root account else you have to give root account password). After switching to root account copy your file into binary path that is “/usr/bin/”.

Now, try to execute your command, you can modify bash scripting file as per your requirement but you should have some basic knowledge of shell scripting to make perfect command that you want to create.

[root@server ramesh]# file-name

Continue reading